-
JavaScript Tutorial
JavaScript Basics
- js-comment
- js-variable
- js-global-variable
- js-data-types
- js-operators
- js-if-statement
- js-switch
- js-loop
- js-function
JavaScript Objects
JavaScript BOM
JavaScript DOM
- 5)-document-object
- getelementbyid
- getelementsbyclassname()
- getelementsbyname
- getelementsbytagname
- js-innerhtml-property
- js-innertext-property
JavaScript Validation
JavaScript OOPs
- js-class
- js-object
- js-prototype
- js-constructor-method
- js-static-method
- js-encapsulation
- js-inheritance
- js-polymorphism
- js-abstraction
JavaScript Cookies
JavaScript Events
- javascript-events
- javascript-addeventlistener()
- js-onclick-event
- js-dblclick-event
- js-onload-event
- js-onresize-event
Exception Handling
JavaScript Misc
- js-this-keyword
- js-debugging
- js-hoisting
- js-strict-mode
- javascript-promise
- js-compare-dates
- javascript-array.length
- javascript-alert()
- javascript-eval()-function
- javascript-closest()
- javascript-continue-statement
- js-getattribute()-method
- js-hide-elements
- javascript-prompt()
- removeattribute()-method
- javascript-reset
- javascript-return
- js-string-split()
- js-typeof-operator
- js-ternary-operator
- js-reload()-method
- js-setattribute()-method
- js-setinterval()-method
- js-settimeout()-method
- js-string-includes()-method
- calculate-current-week-number-in-javascript
- calculate-days-between-two-dates-in-javascript
- javascript-string-trim()
- javascript-timer
- remove-elements-from-array
- javascript-localstorage
- javascript-offsetheight
- confirm-password-validation
- static-vs-const
- how-to-convert-comma-separated-string-into-an-array-in-javascript
- calculate-age-using-javascript
- javascript-label-statement
- javascript-string-with-quotes
- how-to-create-dropdown-list-using-javascript
- how-to-disable-radio-button-using-javascript
JavaScript Advance
- js-typedarray
- js-set
- js-map
- js-weakset
- js-weakmap
- javascript-callback
- javascript-closures
- javascript-date-difference
- javascript-date-format
- js-date-parse()-method
- javascript-defer
- javascript-redirect
- javascript-scope
- javascript-scroll
- javascript-sleep
- javascript-void
- javascript-form
Differences
Questions
- how-to-add-javascript-to-html
- how-to-enable-javascript-in-my-browser
- difference-between-java-and-javascript
- how-to-call-javascript-function-in-html
- how-to-write-a-function-in-javascript
- is-javascript-case-sensitive
- how-does-javascript-work
- how-to-debug-javascript
- how-to-enable-javascript-on-android
- what-is-a-promise-in-javascript
- what-is-hoisting-in-javascript
- what-is-vanilla-javascript
- how-to-add-a-class-to-an-element-using-javascript
- how-to-calculate-the-perimeter-and-area-of-a-circle-using-javascript
- how-to-create-an-image-map-in-javascript
- how-to-find-factorial-of-a-number-in-javascript
- how-to-get-the-value-of-pi-using-javascript
- how-to-make-a-text-italic-using-javascript
- what-are-the-uses-of-javascript
- how-to-get-all-checked-checkbox-value-in-javascript
- how-to-open-json-file
- random-image-generator-in-javascript
- how-to-add-object-in-array-using-javascript
- javascript-window-open-method
- javascript-window-close-method
- how-to-check-a-radio-button-using-javascript
- javascript-const
- javascript-function-to-check-array-is-empty-or-not
- javascript-multi-line-string
- javascript-anonymous-functions
- implementing-javascript-stack-using-array
- javascript-classlist
- javascript-code-editors
- javascript-let-keyword
- random-string-generator-using-javascript
- javascript-queue
- event-bubbling-and-capturing-in-javascript
- how-to-select-all-checkboxes-using-javascript
- javascript-change-event
- javascript-focusout-event
- traverse-array-object-using-javascript
- javascript-create-and-download-csv-file
- how-to-make-beep-sound-in-javascript
- how-to-add-a-whatsapp-share-button-in-a-website-using-javascript
- javascript-execution-context
- javascript-queryselector
- shallow-copy-in-javascript
- how-to-toggle-password-visibility-in-javascript
- removing-duplicate-from-arrays
- javascript-insertbefore
- javascript-select-option
Interview Questions
How to create an image map in JavaScript?JavaScript can be used to create a client-side image map. An image map is an image on the webpage that has multiple links to other pages. These links are called hotspots. An image map is used to navigate different links to other pages or on the same web page. In an image map, an image can be divided into different sections. We can include links to each section, and after clicking a section, it will open the corresponding link. The sections can be divided into different shapes, such as circle, rectangle, or polygon. For creating a rectangular image map, we require two different coordinates that are top right and bottom left. Similarly, for creating a pentagon image map, we require five coordinates. Images map provides a way to link various sections of the image without require creating image files. The usemap attribute is used in the There is another tag called tag, which defines the coordinates and shapes of each section. We can use the events such as onclick, ondblclick, onmouseover, onmouseout, onblur, etc. with the tag. The piece of code for defining the image map is given as follows. SyntaxNow, let's see some illustrations of using the image map to understand it more clearly. ExampleIn this example, there is an image that we are using for creating an image map. We are dividing the image into two sections in the rectangular and circular shape. The first section is the top area of the image, and the second section is the middle area of the image. Output After the execution of the above code, the output will be - 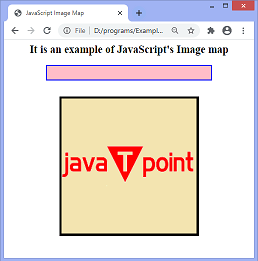 On clicking the top area, the output will be - 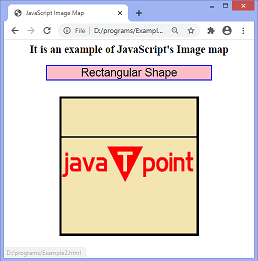 On clicking the middle area, the output will be - 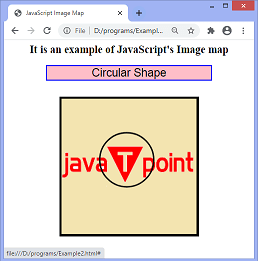 Example2Here, we are passing the images in the href attribute of the tag. It means that when we click on the sections, the corresponding image will be displayed. The image is divided into two sections. The first section is the top area of the image, and the second section is the middle area of the image. On clicking the corresponding sections, first the name is displayed of the linked image in the given textfield, and then the image will show. Output After the execution of the above code, the output will be -  On clicking the top area, the output will be -  On clicking the middle area, the output will be - 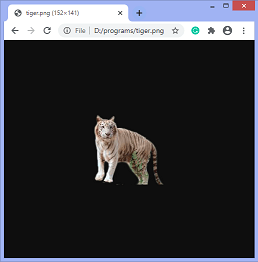
|