-
MySQL Tutorial
- mysql-tutorial
- mysql-features
- mysql-versions
- mysql-data-types
- mysql-variables
- install-mysql
- mysql-connection
MySQL Workbench
User Management
MySQL Database
- mysql-create-database
- mysql-select-database
- mysql-show-databases
- mysql-drop-database
- mysql-copy-database
Table & Views
- mysql-create-table
- mysql-alter-table
- mysql-show-tables
- mysql-rename-table
- mysql-truncate-table
- mysql-describe-table
- mysql-drop-table
- mysql-temporary-table
- mysql-copy-table
- mysql-repair-table
- mysql-add/delete-column
- mysql-show-columns
- mysql-rename-column
- mysql-views
- mysql-table-locking
- mysql-account-lock
MySQL Queries
- mysql-select-record
- mysql-replace
- insert-on-duplicate-key-update
- mysql-insert-ignore
- insert-into-select
MySQL Indexes
- mysql-create-index
- mysql-drop-index
- mysql-show-indexes
- mysql-unique-index
- mysql-clustered-index
- mysql-clustered-vs-non-clustered-index
MySQL Clauses
MySQL Privileges
Control Flow Function
MySQL Conditions
- mysql-and
- mysql-or
- mysql-and-or
- mysql-boolean
- mysql-like
- mysql-in
- mysql-any
- mysql-exists
- mysql-not
- mysql-not-equal
- mysql-is-null
- mysql-is-not-null
- mysql-between
MySQL Join
- mysql-join
- mysql-inner-join
- mysql-left-join
- mysql-right-join
- mysql-cross-join
- mysql-self-join
- mysql-delete-join
- mysql-update-join
- mysql-equijoin
- mysql-natural-join
- left-join-vs-right-join
- mysql-union-vs-join
MySQL Key
MySQL Triggers
- mysql-trigger
- mysql-create-trigger
- mysql-show-trigger
- mysql-drop-trigger
- before-insert-trigger
- after-insert-trigger
- mysql-before-update-trigger
- mysql-after-update-trigger
- mysql-before-delete-trigger
- mysql-after-delete-trigger
Aggregate Functions
- mysql-aggregate-functions
- mysql-count()
- mysql-sum()
- mysql-avg()
- mysql-min()
- mysql-max()
- mysql-group_concat()
- mysql-first()
- mysql-last()
MySQL Misc
- mysql-comments
- export-import-database
- import-csv-file-in-database
- export-table-to-csv
- mysql-subquery
- mysql-derived-table
- mysql-uuid
- lead-and-lag-function
- mysql-cte
- mysql-on-delete-cascade
- mysql-upsert
- mysql-commands-cheat-sheet
- mysql-transaction
- mysql-partitioning
- mysql-row_number()
- mysql-cursor
- mysql-limit
- mysql-stored-function
- mysql-signal-resignal
- number-format-function
- mysql-ranking-functions
- mysql-window-functions
- mysql-union
- union-vs-union-all
- mysql-varchar
- mysql-enum
- mysql-set
- mysql-decimal
- mysql-cast
- mysql-convert()
- mysql-coalesce()
- mysql-wildcards
- mysql-alias
- mysql-functions
- mysql-rollup
- mysql-int
- mysql-today
- mysql-row-count
- prepared-statement
- mysql-literals(constants)
- mysql-date-time
- mysql-procedure
- mysql-minus
- mysql-intersect
- mysql-storage-engines
- mysql-explain
- mysql-sequence
- mysql-json
- mysql-standard-deviation
- how-to-select-nth-highest-record
- find-duplicate-records
- delete-duplicate-records
- mysql-select-random-records
- mysql-extract
- mysql-processlist
- mysql-bit
- change-column-type
- mysql-reset-auto-increment
- mysql-interval
- login-with-different-user
MySQL Globalisation
Regular Expressions
- regular-expressions
- mysql-rlike
- not-like-operator
- not-regexp-operator
- regexp-operator
- regexp_instr()-function
- regexp_like()-function
- regexp_replace()-function
- regexp_substr()-function
FULLTEXT Search
- mysql-fulltext-search
- natural-language-fulltext-search
- boolean-fulltext-search
- query-expansion-fulltext-search
- ngram-fulltext-parser
Differences
- mysql-vs-mongodb
- mysql-vs-ms-sql-server
- mysql-vs-oracle
- mariadb-vs-mysql
- postgresql-vs-mysql
- mysql-vs-sql
- table-vs-view
- delete-vs-truncate-command
- database-vs-schema
- primary-key-vs-foreign-key
- primary-key-vs-unique-key
- primary-key-vs-candidate-key
Interview Questions
MySQL AFTER UPDATE TRIGGERThe AFTER UPDATE trigger in MySQL is invoked automatically whenever an UPDATE event is fired on the table associated with the triggers. In this article, we are going to learn how to create an AFTER UPDATE trigger with its syntax and example. SyntaxThe following is the syntax to create an AFTER UPDATE trigger in MySQL: We can explain the parameters of AFTER UPDATE trigger syntax as below:
If we want to execute more than one statement, we will use the BEGIN END block that contains a set of SQL queries to define the logic for the trigger. See the below syntax: Restrictions
AFTER UPDATE Trigger ExampleLet us understand how to create an AFTER UPDATE trigger using the CREATE TRIGGER statement in MySQL with an example. Suppose we have created a table named students to store the student's information as follows: Next, we will insert some records into this table using the below statement: Execute the SELECT query to see the table data. 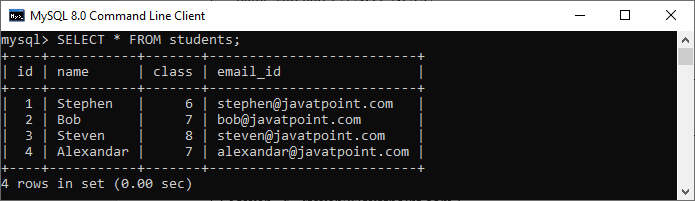 Third, we will create another table named students_log that keeps the updated information in the selected user. We will then create an AFTER UPDATE trigger that promotes all students in the next class, i.e., 6 will be 7, 7 will be 8, and so on. Whenever an updation is performed on a single row in the "students" table, a new row will be inserted in the "students_log" table. This table keeps the current user id and a description regarding the current update. See the below trigger code. 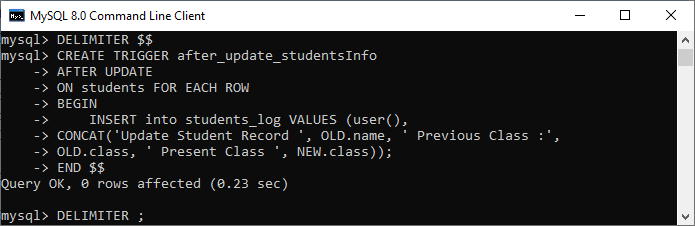 In this trigger, we have first specified the trigger name after_update_studentsInfo. Then, specify the triggering event. Third, we have specified the table name on which the trigger is associated. Finally, we have written the trigger logic inside the trigger body that performs updation in the "students" table and keeps the log information in the "students_log" table. How to call the AFTER UPDATE trigger?First, we will update the "students" table using the following statements that invoke the above-created trigger: Next, we will query data from the students and students_log table. We can see that table has been updated after the execution of the query. See the below output: 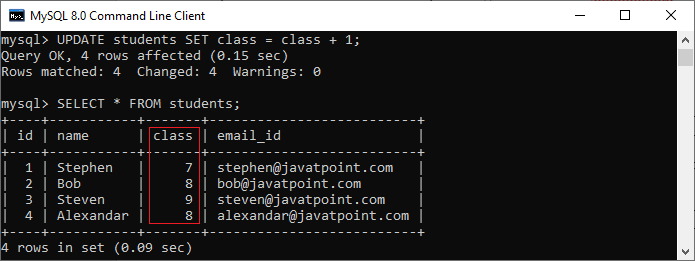 Again, we will query data from the students_log table that keeps the current user id and a description regarding the current update. See the below output: 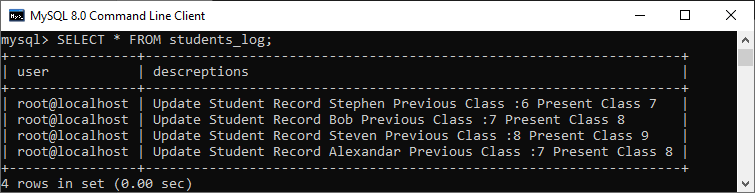 How to create AFTER UPDATE trigger in MySQL workbench?To create an AFTER UPDATE trigger in workbench, we first launch the MySQL Workbench and log in using the username and password. We will get the UI as follows: 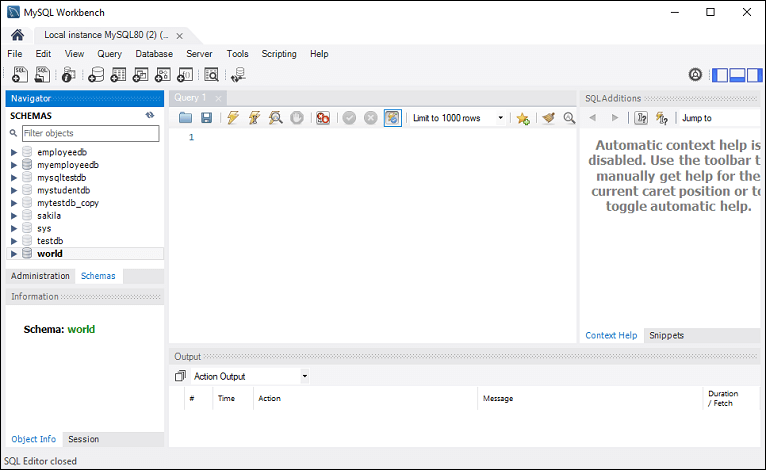 Now do the following steps to create an AFTER UPDATE trigger: 1. Go to the Navigation tab and click on the Schema menu. It will display all databases available in the MySQL database server. 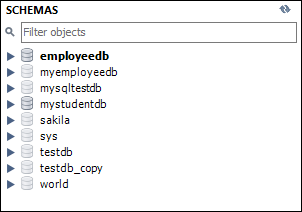 2. Select the database (for example, mystudentdb). Then, double click on the selected schema. It displays the sub-menu containing Tables, Views, Functions, and Stored Procedures. See the below screen. 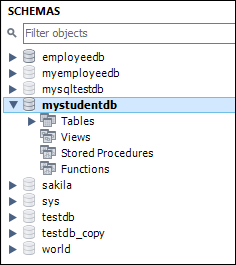 3. Expand the Tables sub-menu and select a table on which you want to create a trigger. Then, right-click on the selected table (for example, students), and click on the Alter Table option. See the below image: 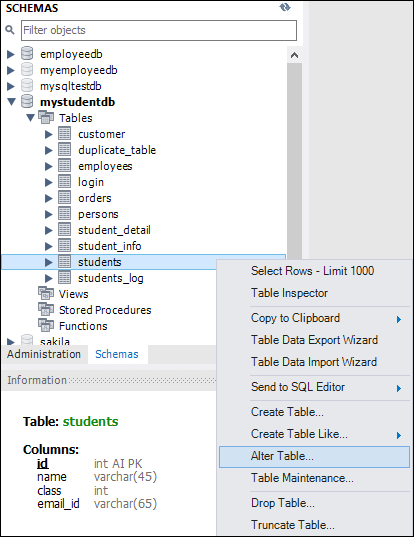 4. Clicking on the Alter Table option gives the screen as below: 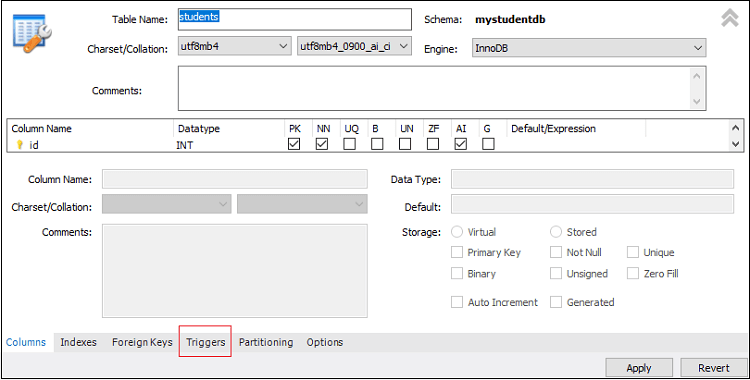 5. Now, click on the Trigger tab shown in the previous section's red rectangular box, then select the Timing/Event AFTER UPDATE. We will notice that there is a (+) icon button to add a trigger. Clicking on that button, we will get a default code on the trigger based on choosing Timing/Event: 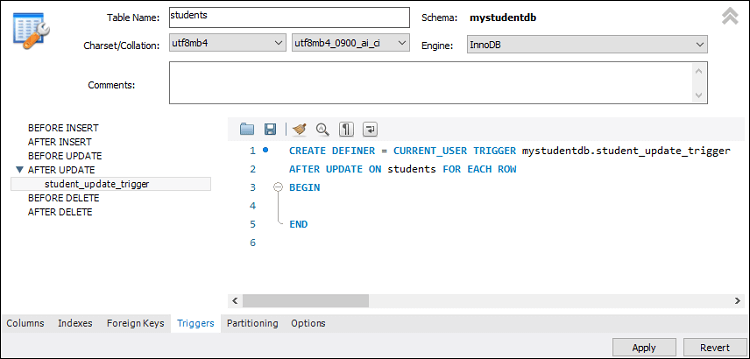 6. Now, complete the trigger code, review them once again, and if no error is found, click on the Apply button. 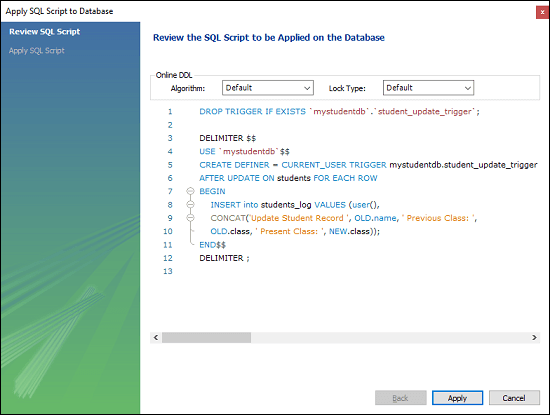 7. After clicking on the Apply button, click on the Finish button to complete the process. 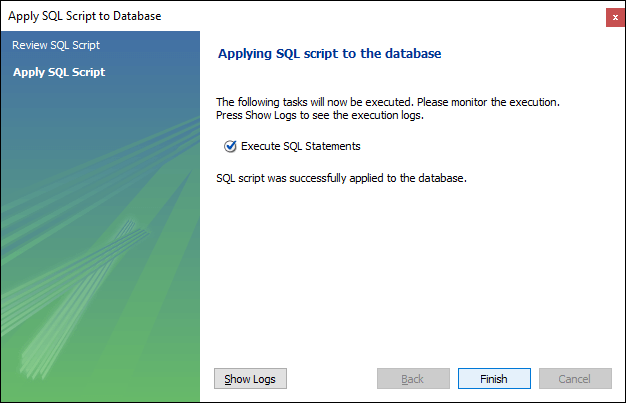 8. If we look at the schema menu, we can see student_update_trigger under the "students" table as follows: 
Next TopicMySQL BEFORE DELETE Trigger
|